Posts

Showing posts from May, 2008

Print e-mail when it arrives

For a variety of reasons, some of us end up printing e-mail messages. If you print most of your messages, or all of your messages from a specific source, opening each message to print it manually interrupts your work. Setting a rule to print the desired incoming mail might be more efficient. To do so: 1. From the Tools menu, choose Rules And Alerts. 2. Click New Rule on the E-mail Rules tab. 3. Click Start From A Blank Rule at the top of the resulting Rules Wizard dialog box. 4. In the Step 1 box, highlight the Check Messages When They Arrive option (it should be the default) and then click Next. 5. In the Step 1 box, select the Where My Name Is In The To Box check box (or whatever option applies, if you don't want to print all you messages) and click Next. 6. In the Step 1 box, click the Print It option and click Next. 7. At this point, you can identify exceptions to the rule, but we won't do that here. Just click Next, and then Finish, Apply, and OK to return to Outlook. Afte
Control how you print notes

If you use the Notes feature to jot down questions, ideas, or quick reminders, you might also want to print them occasionally. By default, Outlook prints each note on a separate page, which might or might not be what you want. You can force Outlook to fill each page, to save paper or to keep related notes together. Select the notes you want to print and then choose Print from the File menu. In the resulting Print dialog box, deselect the Start Each Item On A New Page check box in the Print Options and click OK. If the option is disabled, you're using HTML format. You must switch to plain or text format to enable this option. To do so, choose Options from the Tools menu. Click on the Mail Format tab and choose Plain Text from the Compose In This Message Format option's drop-down list. Then, click Apply and OK. Repeat the print instructions, and you'll find the Start Each Item On A New Page option is enabled. After printing the notes, just retrace your steps to reset your for

Save a few keystrokes when entering dates

When entering the start and due dates for a new task, you don't have to type the entire date. If a date is in the current month, just enter the day and Outlook will enter the rest of the date for you. For instance, if the current month is March and you enter 14, Outlook assumes you mean March 14 of the current year and fills in that date. When a date isn't in the current month, you can still save a few keystrokes by entering the month and day. Outlook will fill in the year as follows: If the month and day haven't occurred in the current year, Outlook uses the current year. If the month and day have passed, Outlook uses the next year.

Outlook shorthand for dates

Image
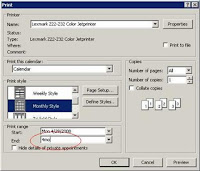
Go to Calender in Outlook and select print from the File menu. Select monthly style in the print style option When selecting a range of calendar months to print, you can use shorthand instead of entering a literal end date. For instance, if you want to print four calendar months, you can enter any date as the start month and then enter 4mo, instead of a literal date, for the end date. Outlook will interpret your shorthand and print accordingly. Most of us can type 4mo faster than we can count four months into the future.