Posts

10+ lesser-known shortcuts for formatting Word text

Your users probably have a few favorite keyboard shortcuts for formatting text — like Ctrl + B for applying boldface, Ctrl + I for applying italics, Ctrl + U for underlining, and maybe Ctrl + L to left-align text. But Word provides buttons for those tasks on the Formatting toolbar, so any efficiency gains are kind of a toss-up. The real convenience lies in knowing some more obscure keyboard shortcuts — ones that have no default button equivalents and that can save users from having to scrounge around dialog boxes looking for the appropriate options. Here are some shortcuts that are especially good for users to have under their belt. Keystroke Function Ctrl + Shift + D Double underline the selected text Ctrl + ] Increase the size of selected text by 1 point Ctrl + [ Decrease the size of selected text by 1 point Ctrl + Shift + A Make selected text all caps Ctrl + = Toggle subscripting for selected text Ctrl + + Toggle superscripting for selected text Ctrl + Shift + Q Apply Sym

Use Find and Replace to apply formatting

You probably use Find and Replace to replace existing text with new text — that’s the feature’s typical use. However, it’s flexible enough to handle much more than switching out text. You can use it to apply formatting. For instance, let’s suppose you want to display your company name in blue so it stands out against the normal black text. You could review the document to find each occurrence of your company’s name and apply the appropriate color manually. But that would be tedious, and you’d risk missing an occurrence or two. Instead, use Find and Replace as follows: 1.From the Edit menu, choose Replace (or press [Ctrl]+H). 2.In the Find What control, type the text you want to format. In this case, that’s your company’s name. 3.Place the cursor in the Replace with 4.Click the More button/ Option. 5.Click the Format button and select Font. 6.Choose a color from the Font Color control’s palette and then click OK. (You can apply any combination of formats.) 7.Click Find Next to format ea

Use Named Constants to Store Numbers

Image
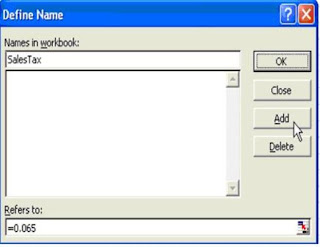
Problem: It is also possible to assign a name to a constant. This could be useful if you have a number, such as a local sales tax rate, that changes once a year. Strategy: From the menu, use Insert – Name – Define. Type a name like SalesTax. In the Refers to box, type =0.065 and click Add, as shown below In this workbook, you can now use a formula such as =SalesTax*D2, as shown in below. If the tax rate changes later use Insert – Name – Define to change the constant assigned to the name. Summary: To name a constant in a workbook use Insert – Name – Define, type in the name of the constant, and then define the constant in the Refers to: box.

Have Excel Always Open Certain Workbook(s)

Image
Problem: You always use Excel to work on a particular workbook. Every time that you open Excel, you want this workbook to open automatically. Strategy: Place the file (or a shortcut to the file) in the XLStart folder. This folder can generally be found in the C:\Documents and Settings\Username\Application Data\Microsoft\Excel\ folder. Anything in this folder will automatically start when Excel starts. You place as many as file you want to open automatically

Using 2 sheet of workbook in 2 different window

Image
Problem : Is there ever a time that you would want to view & use the 2 sheets of the same workbook simultaneously. Yes. Solution : Let’s say that you want to see both Sheet1 and Sheet2 of the workbook at the same time. Follow these steps: 1) From the menu, select Window – New Window. 2) In the :2 version of the workbook, switch to Sheet2. 3) From the menu, select Window – Arrange. 4) In the Arrange dialog, choose Windows of Active Workbook and Vertical. Choose OK. Result: As shown in Fig., you can see the two different sheets, side by side. Once your done, you can close one of the window and any changes made in any of the window will be saved in the workbook automatically

Double the Value of the Recently Used File List

Image
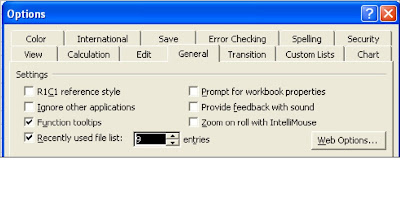
Problem: You routinely open the same six workbooks. The File menu shows only the last four workbooks that you opened or saved. It sure would be nice if it showed at least the last six workbooks. Strategy: Good news! You can increase the Recently Used File List(located at the bottom of the File menu) from four to nine workbooks. Go to Tools – Options – General. Use the spin button to dial the Recently Used File List from 4 to 9, as shown in Fig. 17. Immediately after changing the value, your list may only show four files. You have to open and close additional files to expand the list

Format Painter tool

Copy the formatting (attributes) of one or more cells and apply them to another cell or range Once you learn to use the Format Painter tool (which looks like a little yellow paintbrush on the Standard toolbar), you’ll wonder how you ever got by without it. To format a cell (or cells), select a cell (or cells) that are formatted the way you like and click Format Painter. Then, click and drag to apply that formatting to another cell (or range of cells). Here’s an example to illustrate how Format Painter works. Start by manually formatting cell A1 as Times New Roman 9, bold, and underlined and then use the Fill Color tool to make the background of the cell yellow. With cell A1 selected, click Format Painter. You’ll notice that Excel displays a paintbrush next to the cursor. While that paintbrush is visible, all you have to do is click (and/or drag) to apply all of the attributes from cell A1 to any other cells. This shortcut saves time because you don’t have to manually reapply the font a